In the third installment of our NoSql MongoDB series, we will detail how to implement search filters for logs stored in MongoDB.
This is the third installment in our NoSql MongoDB series: the main goal of this series is to learn how to deploy and configure OFBiz logging with MongoDB and to get a taste of the MongoDB API.
In the first installment, we discussed how to store the OFBiz Logs in MongoDB. In the second installment we discussed how to create a screen in OFBiz to view the logs. Today we will enhance the screen by implementing search fields (free form text and checkboxes) in order to search and filter the logs in MongoDB.
In this this tutorial we will learn how to implement MongoDB searches constrained by options selected by the user; understanding and applying search filters allows the user to access powerful search capabilities for logs, and at the end of this session you will have a working example of a screen that can be further improved to become a powerful tool to extract and analyze the logs to monitor the health of the system.
Prerequisites
In this tutorial we assume that MongoDB and Apache OFBiz are properly setup, as described in the first installment in the MongoDB series, and we will also enhance the screen we have implemented in the second installment: before proceeding, make sure you have successfully followed the steps described there.
Since we are going to edit the files we have created in the previous post, for brevity we will not specifying their location but will refer to them by name; please review the previous post for further details.
Step-by-step guide
With the following steps we will replace the log data selection service with a more flexible one (to process search constraints) and we will add some fields to the screen to let our user to specify the search constraints.
1. As a first step, we modify the way the data preparation service is executed.
Instead of calling the service from the Groovy script LogViewMongo.groovy, we call it before the screen execution, by properly configuring the request map definition.
In the screen definition, remove the line, highlighted below, that used to call the LogViewMongo.groovy script; we do not need this script anymore:
<screen name="LogViewMongoDb">
    <section>
        <actions>
            <set field="titleProperty" value="ViewMongoDbLogs"/>
            <set field="tabButtonItem" value="logFromMongo"/>
            <script location="component://webtools/webapp/webtools/WEB-INF/actions/log/LogViewMongo.groovy"/>
        </actions>
        <widgets>
            <decorator-screen name="log-decorator">
                <decorator-section name="body">
                    <screenlet>
                        <container style="button-bar">
                            <link target="LogViewMongoDb" text="${uiLabelMap.CommonRefresh}" style="buttontext refresh"/>
                        </container>
                        <screenlet title="Search Logs">
                            <include-form name="MongoLogSearch" location="component://webtools/widget/LogForms.xml"/>
                        </screenlet>
                        <platform-specific>
                            <html><html-template location="component://webtools/webapp/webtools/log/MongoDbLogs.ftl"/></html>
                        </platform-specific>
                    </screenlet>
                </decorator-section>
            </decorator-screen>
        </widgets>
    </section>
</screen>
Then associate, in the controller.xml file, the service call to the request-map for this screen, by adding the line highlighted below:
<request-map uri="LogViewMongoDb">
    <security https="true" auth="true"/>
    <event type="service" invoke="searchMongoDbLogs"/>
    <response name="success" type="view" value="LogViewMongoDb"/>
</request-map>
With these changes, the service “LogViewMongoDb” will be executed before the screen is rendered, rather than being executed by the screen itself.
2. Add a new section to the “LogViewMongoDb” screen in LogScreens.xml.
The code highlighted below show the new lines:
<screen name="LogViewMongoDb">
    <section>
        <actions>
            <set field="titleProperty" value="ViewMongoDbLogs"/>
            <set field="tabButtonItem" value="logFromMongo"/>
        </actions>
        <widgets>
            <decorator-screen name="log-decorator">
                <decorator-section name="body">
                    <screenlet>
                        <container style="button-bar">
                            <link target="LogViewMongoDb" text="${uiLabelMap.CommonRefresh}" style="buttontext refresh"/>
                        </container>
                        <screenlet title="Search Logs">
                            <include-form name="MongoLogSearch" location="component://webtools/widget/LogForms.xml"/>
                        </screenlet>
                        <platform-specific>
                            <html><html-template location="component://webtools/webapp/webtools/log/MongoDbLogs.ftl"/></html>
                        </platform-specific>
                    </screenlet>
                </decorator-section>
            </decorator-screen>
        </widgets>
    </section>
</screen>
The new screen let section will contain the fields to set the search constraints.
3. Define the form with the constraints fields in LogForms.xml.
The form defines one free text search field, four checkboxes to select different logging levels and one button to submit the data and run the query:
<form name="MongoLogSearch" type="single" target="LogViewMongoDb" header-row-style="header-row"
       default-table-style="basic-table">
    <field name="searchText" title="${uiLabelMap.CommonSearch}"><text client-autocomplete-field="true"/></field>
    <field name="fatal" title="${uiLabelMap.WebtoolsFatalLogLevel}"><check/></field>
    <field name="error" title="${uiLabelMap.WebtoolsErrorLogLevel}"><check/></field>
    <field name="warning" title="${uiLabelMap.WebtoolsWarningLogLevel}"><check/></field>
    <field name="info" title="${uiLabelMap.WebtoolsInfoLogLevel}"><check/></field>
    <field name="submit" title="${uiLabelMap.CommonSearch}"><submit/></field>
</form>
4. Prepare the definition for the new data selection service to search the logs based on constraints and return results to the user. To accomplish this, add to services.xml the following code:
<service name="searchMongoDbLogs" engine="java"
        location="org.ofbiz.webtools.MongoDbServices" invoke="searchMongoDbLogs" auth="true" use-transaction="false">
    <description>Search logs from MongoDB</description>
    <attribute name="searchText" type="String" mode="IN" optional="true"/>
    <attribute name="fatal" type="String" mode="IN" optional="true"/>
    <attribute name="error" type="String" mode="IN" optional="true"/>
    <attribute name="warning" type="String" mode="IN" optional="true"/>
    <attribute name="info" type="String" mode="IN" optional="true"/>
    <attribute name="logList" type="List" mode="OUT" optional="false"/>
</service>
The service accepts the five search constraints and returns a list of logs. All parameters are optional: if no parameter is sent to the service then an unconstrained search is executed.
5. Finally, implement the service in Java.
Here is the full code:
public static Map<String, Object> searchMongoDbLogs(DispatchContext dctx, Map<String, ? extends Object> context) {
    String searchText = (String) context.get("searchText");
    String fatal = (String) context.get("fatal");
    String error = (String) context.get("error");
    String warning = (String) context.get("warning");
    String info = (String) context.get("info");
    List<DBObject> logList = new ArrayList<DBObject>();
    Map<String, Object> resp = ServiceUtil.returnSuccess();

    List<String> selectedOptions = new ArrayList<String>();
    // Find out the checkboxes selected
    if ("Y".equals(fatal)) {
        selectedOptions.add("FATAL");
    }
    if ("Y".equals(error)) {
        selectedOptions.add("ERROR");
    }
    if ("Y".equals(warning)) {
        selectedOptions.add("WARNING");
    }
    if ("Y".equals(info)) {
        selectedOptions.add("INFO");
    }

    // By default, select all levels
    if (selectedOptions.isEmpty()) {
        selectedOptions.add("ERROR");
        selectedOptions.add("INFO");
        selectedOptions.add("FATAL");
        selectedOptions.add("WARNING");
    }

    // Get DBCollection object by connecting to MongoDB
    DBCollection collection = getConnectionMongoDb("ofbiz", "ofbiz", "ofbiz", "applicationLog");
    BasicDBObject basicDBObject = new BasicDBObject();
    basicDBObject.put("level", new BasicDBObject("$in", selectedOptions));
    if (UtilValidate.isEmpty(searchText)) {
        // If no search text is entered:
        // call the find method constrained by the log level selected
        // set limit to 400 logs
        DBCursor cursor = collection.find(basicDBObject).limit(400);
        // Sort results based on date
        cursor.sort(new BasicDBObject("date", -1));
        // Iterate records and add them to list
        while (cursor.hasNext()) {
            DBObject dbObject = cursor.next();
            logList.add(dbObject);
        }
        cursor.close();
        resp.put("logList", logList);
    } else {
        // If search text is entered:
        // prepare a regular expression for the search text
        BasicDBObject regexQuery = new BasicDBObject();
        regexQuery.put("message", new BasicDBObject("$regex", searchText).append("$options", "i"));

        BasicDBObject andQuery = new BasicDBObject();

        List<BasicDBObject> obj = new ArrayList<BasicDBObject>();
        obj.add(regexQuery);
        obj.add(basicDBObject);
        // Constrain using both the conditions: search text and levels
        andQuery.put("$and", obj);
        // Perform the find operation
        DBCursor cursor = collection.find(andQuery).limit(400);
        // Sort results based on date
        cursor.sort(new BasicDBObject("date", -1));
        // Iterate records and add them to list
        while (cursor.hasNext()) {
            DBObject dbObject = cursor.next();
            logList.add(dbObject);
        }
        cursor.close();
        resp.put("logList", logList);
    }
    return resp;
}
The service receives the search constraints in its input, opens a connection with MongoDB, runs the query with search constraints and returns a list of log statements.
The MongoDB “$in” operator is used with the log levels selected by the user (info, warning, error, fatal): all the records matching any of the log levels selected will be retrieved.
A regular expression query is used to search logs when the user enters text in the free form search, together with the “$and” operation to further constraints by logging level.
The records are sorted by date (most recent first).
For further details, you can study the code and its comments, that should be sect explanatory; you can also explore the MongoDB Java API and the MongoDB operator documentation.
Conclusions
Congratulations! We can build and start OFBiz with the command:
./ant build start
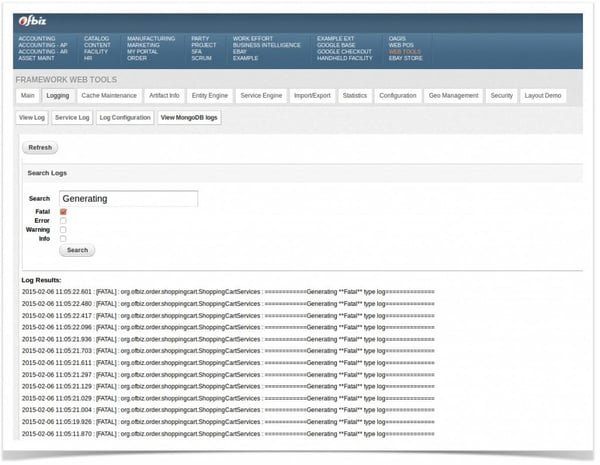
You can now point your browser to https://localhost:8443/webtools/control/LogViewMongoDb and test the enhanced screen that should look like this:

Contact HotWax Systems
HotWax Systems designs, implements and supports fully customizable digital commerce solutions powered by Apache OFBiz. Contact us today to learn how to leverage the flexibility and power of OFBiz to benefit your enterprise.
Photo credit: sylvar / Foter / CC BY Photo credit: sylvar / Foter / CC BY


