As you become an expert OFBiz developer, you will certainly need to know all about the OFBiz Form Widget! Here at HotWax Media we use the Form Widget regularly, whether as part of a front end e-commerce shopping cart or as part of a back-end ERP administration screen (for example OFBiz screens to handle order management, warehouse management, and inventory management as part of your integrated online retail OFBiz system).
In this post we will explore some of the features offered by the form widget, the layer in the OFBiz framework that enables the implementation of list based user interface elements. We will do this by continuing the exercise we started in our earlier “OFBiz Tutorial” posts. Specifically, this exercise is based on the “hwm” component we have setup in OFBiz Tutorial – Custom Components In OFBiz and on the custom “product list” screen we have built in OFBiz Tutorial – Building A Simple Product List Screen
Note: Before proceeding further please make sure you have following block of code available either in the screen or in the form-
<actions>
    <entity-condition entity-name="Product">
        <order-by field-name="productId"/>
    </entity-condition>
</actions>
Here is the form widget definition for the list of products that we have created in the last post:
<form name="ListProducts" type="list" list-name="products">
    <auto-fields-entity entity-name="Product" default-field-type="display"/>
</form>
The auto-fields element was all we needed to retrieve the fields defined in the “Product” entity (entity-name) and render them as “display” fields (default-field-type). The goal of this post is to fine tune the list definition, in order to render only a subset of the fields and also to render them in a richer way; specifically:
- we want to render the “product id” field as a link to the “product detail screen” in the OFBiz “Catalog” application
- instead of displaying the id in the “product type id” field, we want to display the description associated to that id
- we are only interested in the following fields from the “Product” entity: “product id” (as a link), “product type id” (as a description), “internal name”, “description”
- we want to add two computed fields containing the “quantity on hand” and “available to promise” quantity of the items in inventory
Defining links
In order to transform the “product id” field into a link, we will simply add the field definition right after the “auto-fields” element; in this way, the explicit field type (link) will override the field type defined by the “default-field-type” attribute; here is the updated field definition:
<form name="ListProducts" type="list" list-name="products">
    <auto-fields-entity entity-name="Product" default-field-type="display"/>
    <field name="productId" widget-style="buttontext">
        <hyperlink target="/catalog/control/EditProduct" target-type="inter-app" description="${productId}">
            <parameter param-name="productId"/>
        </hyperlink>
    </field>
</form>
When you refresh the screen you will immediately see the new form definition in action. Here are some details about the new field definition:
- the attribute widget-style=”buttontext” sets the style for the field by using one of the many styles available in OFBiz (and defined in a shared CSS stylesheet; you can of course define and use your own styles)
- the “description” attribute in the “hyperlink” element defines the text rendered as hyperlink; we have used the ${} notation to insert the “productId” variable
- the “target” attribute in the “hyperlink” element defines the url for the hyperlink; this url is defined in the controller.xml file of the corresponding “catalog” web application (defined in the applications/product component); since the link, from the “hwm” application, points to a different application we use the target-type=”inter-app” attribute
- the “description” attribute in the “hyperlink” element defines the text rendered as hyperlink; we have used the ${} notation to insert there the “productId” variable
- the “parameter” element is needed because the EditProduct url requires that a productId parameter is passed to it
Performing lookups to different entities
Instead of displaying the id for the product type, as stored in the Product.productTypeId field, we prefer to display the description associated to that type; for example, instead of “FINISHED_GOOD” we want “Finished Good”. The description is not stored in the Product entity, it is instead in the ProductType entity: we have to use the Product.productTypeId field to perform a table lookup in the ProductType entity (Product.productTypeId = ProductType.productTypeId), and use the content of the ProductType.description field when the form is rendered. The form widget has built-in support for this, the “display-entity” element:
<field name="productTypeId" title="Product Type">
    <display-entity entity-name="ProductType"/>
</field>
When you refresh the screen you will immediately see the new form definition in action. Here are some details about the new field definition:
- the “entity-name” defines the entity to lookup
- this is all we have to specify here, because, if not specified, OFBiz assumes that the name of the field (name=”productTypeId”) is the same in both entities and assumes that a “description” field is available in the referenced entity; if the id and description fields in the referenced entity have different names, you can specify them by adding the “description” and “key-field-name” attributes to the “display-entity” element
Displaying just the fields we need
We now realize that we don’t need most of the fields of the “Product” entity; for this reason it is easier to remove the “auto-fields” element and simply add the field definition for the two more fields we want to display (“internal name” and “description”). Here is the new form definition:
<form name="ListProducts" type="list" list-name="products">
	<field name="productId" widget-style="buttontext">
		<hyperlink target="/catalog/control/EditProduct" description="${productId}" target-type="inter-app">
			<parameter param-name="productId"/>
		</hyperlink>
	</field>
	<field name="productTypeId" title="Product Type">
		<display-entity entity-name="ProductType"/>
	</field>
	<field name="internalName"><display/></field>
	<field name="description"><display/></field>
</form>
Displaying fields computed by services
This is the most interesting part of this exercise. We want to add two additional fields to the list: one with the count of units physically in the warehouse for the product, and one with the units available in warehouse for sales (i.e. units not reserved by sales orders). This information is not stored in the Product or other entities, and computing the units is not an easy task, because, in order to enable multi warehouse support, material tracking and quality control, the OFBiz data model for inventory is rather complex. However there is a standard service (a reusable business logic) specifically designed to count inventory: the “getProductInventoryAvailable” service. In its simplest form the service takes as input a productId and returns as output a map containing two fields, “quantityOnHandTotal” and “availableToPromiseTotal”; this is exactly what we need. But we have to call this service for each record in the list, get the result from the service and use it to populate the two new columns. Again, the form widget assists us with built-in support for service calls, using the “row-actions” and “service” elements:
<form name="ListProducts" type="list" list-name="products">
	<row-actions>
		<service service-name="getProductInventoryAvailable" result-map="inventoryAvailableMap">
			<field-map field-name="productId" from-field="productId"/>
		</service>
	</row-actions>
...
</form>
- all the actions inside the “row-actions” section are executed before each row is rendered; this tag is similar to the “actions” tag that we have used in a previous post, with the only difference that “actions” is executed once before the list is rendered, while “row-actions” is executed before each and every row in the list; a form definition can also contain both action elements
- the “service” action is a convenient way to invoke a service: the service name is specified with the “service-name” attribute, the “field-map” elements are used to pass the input parameters to the service, the “result-map” attribute defines the name of the output map
We can now add the two new computed fields in the following way:
<field name="qoh" entry-name="inventoryAvailableMap.quantityOnHandTotal">
	<display/>
</field>
<field name="atp" entry-name="inventoryAvailableMap.availableToPromiseTotal">
	<display/>
</field>
the “entry-name” attribute is used to explicitly specify the source of the content: the service result map that we have named “inventoryAvailableMap”, and the “quantityOnHandTotal” and “availableToPromiseTotal” fields.
Conclusion
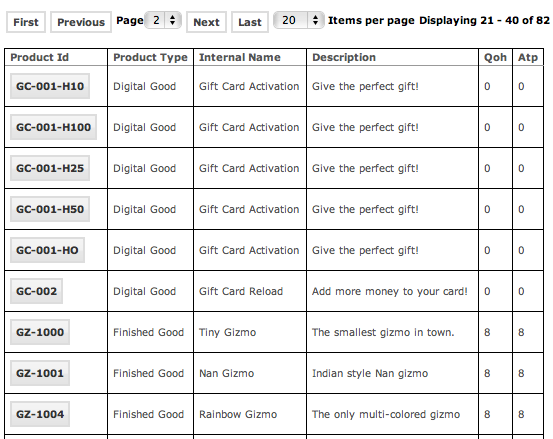
Here is the final result of our programming efforts:
<form name="ListProducts" type="list" list-name="products">
	<row-actions>
		<service service-name="getProductInventoryAvailable" result-map="inventoryAvailableMap">
			<field-map field-name="productId" from-field="productId"/>
		</service>
	</row-actions>
	<field name="productId" widget-style="buttontext">
		<hyperlink target="/catalog/control/EditProduct" description="${productId}" target-type="inter-app">
			<parameter param-name="productId"/>
		</hyperlink>
	</field>
	<field name="productTypeId" title="Product Type">
		<display-entity entity-name="ProductType"/>
	</field>
	<field name="internalName"><display/></field>
	<field name="description"><display/></field>
	<field name="qoh" entry-name="inventoryAvailableMap.quantityOnHandTotal">
		<display/>
	</field>
	<field name="atp" entry-name="inventoryAvailableMap.availableToPromiseTotal">
		<display/>
	</field>
</form>
and here is how the list is rendered:

Our form is now completed and in the next post we will reuse it to build a CSV (Comma Separated Value) export.
– Jacopo