
It’s like magic! Today’s OFBiz tutorial from HotWax Systems details how to customize and use OFBiz Webtools to fetch and view logs from NoSql MongoDB. Work smarter, not harder with our MongoDB Tutorial Series.
In the first installment of our Mongo DB series, we showed you how to store OFBiz logs in MongoDB, the popular NoSql database. Today’s installment provides detailed instructions about how to create a screen in OFBiz to fetch and display the logs stored in MongoDB.
The Webtools application, enabled by default when OFBiz is started, is a central place to access a series of tools for the monitoring and administration of the OFBiz instance: we will enhance the Webtools application by adding the new screen to it.
![]()
Prerequisites
In this tutorial we assume that MongoDB and Apache OFBiz are properly setup and configured in your system in order to have OFBiz logs stored in MongoDB: before proceeding, make sure you have successfully followed the steps described in the first installment in the MongoDB Series.
Step-by-step guide
Steps 1 to 6 describe how to customize an existing application by adding a new service, screen and menu definitions; they are not specific to MongoDB and are useful to refresh your OFBiz programming skills.
If you are already confident with the subject and you can’t wait to play with MongoDB API, then you can jump to step 7, where we describe how to connect to MongoDB and fetch the logs.
1. Add a menu item in OFBiz for the new screen. Add this menu item to the menu named “LoggingTabBar” in file framework/webtools/widget/Menus.xml. as shown below:
<menu name="LoggingTabBar" extends="CommonTabBarMenu" extends-resource="component://common/widget/CommonMenus.xml"
          selected-menuitem-context-field-name="tabButtonItem">
        ..........
        <menu-item name="logFromMongo" title="View MongoDB Logs">
            <link target="LogViewMongoDb"/>
        </menu-item>
</menu>
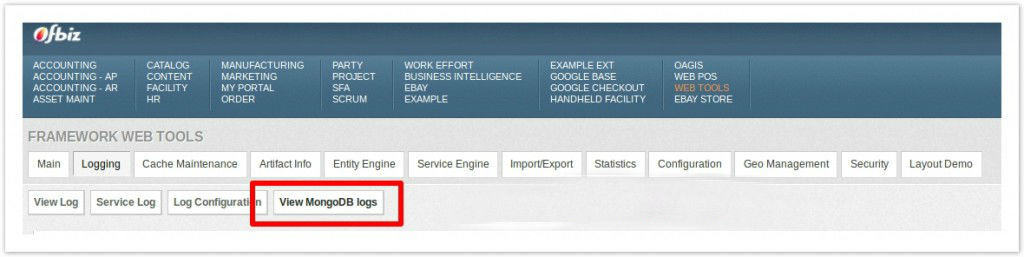
A menu item titled “View MongoDB Logs” has now been created. When selected, this link triggers the controller request. It will then create a menu button in the Webtools logging menu, which will look like this:
2. Add a request and view map to the Webtools controller (framework/webtools/webapp/webtools/WEB-INF/controller.xml). Here is the associated code snippet:
.........
<request-map uri="LogViewMongoDb">
        <security https="true" auth="true"/>
        <response name="success" type="view" value="LogViewMongoDb"/>
</request-map>
.........
<view-map name="LogViewMongoDb" type="screen" page="component://webtools/widget/LogScreens.xml#LogViewMongoDb"/>
With this configuration, the URL generated by the menu item created in step 1 is associated to the “LogViewMongoDb” screen.
3. Add a screen definition to the LogScreens.xml in framework/webtools/widget/LogScreens.xml as shown in following code snippet:
<screen name="LogViewMongoDb">
    <section>
        <actions>
            <set field="titleProperty" value="ViewMongoDbLogs"/>
            <set field="tabButtonItem" value="logFromMongo"/>
            <script location="component://webtools/webapp/webtools/WEB-INF/actions/log/LogViewMongo.groovy"/>
        </actions>
        <widgets>
            <decorator-screen name="log-decorator">
                <decorator-section name="body">
                    <screenlet>
                        <container style="button-bar">
                            <link target="LogViewMongoDb" text="${uiLabelMap.CommonRefresh}" style="buttontext refresh"/>
                        </container>
                        <platform-specific>
                            <html><html-template location="component://webtools/webapp/webtools/log/MongoDbLogs.ftl"/></html>
                        </platform-specific>
                    </screenlet>
                </decorator-section>
            </decorator-screen>
        </widgets>
    </section>
</screen>
OFBiz Screens define how data is prepared and rendered. In the above screen definition, the data is prepared by a Groovy script (LogViewMongo.groovy) and is rendered by a FreeMarker template (MongoDbLogs.ftl). The Groovy script is implemented in step 4 and the FreeMarker template is implemented in step 5. A button for refreshing the screen is also defined in the screen.
4. Create a Groovy file to prepare the data for our screen in the framework/webapp/webtools/WEB-INF/actions/log folder. Name the file LogViewMongo.groovy. The content of the file is the following:
import org.ofbiz.webtools.*;
result = runService("getAllLogsFromMongoDb", ["userLogin": userLogin]);
logList = result.get("logList");
context.logList = logList;
The script simply calls an OFBiz Service to which we delegate the task of fetching the data from MongoDB. The service definition and implementation are described in step 6 and 7.
5. Create a new FreeMarker file in the framework/webtools/webapp/webtools/log folder to render the data. Name the file MongoDbLogs.ftl. The content of the file is the following:
<h3>Log Results: </h3>
<#if logList?has_content>
    <#list logList as logLine>
      <div>${logLine.date?datetime} : [${logLine.level}] : ${logLine.loggerName} : ${logLine.message}</div>
    </#list>
<#else>
    No Logs found!
</#if>
This template iterates over the list of logs prepared by the Groovy script in step 4 and renders an HTML page with information from each log entry.
6. Create a service definition for the service responsible for fetching log data from MongoDB. To accomplish this, define the service in the framework/webtools/servicedef/services.xml file by adding the following definition:
<service name="getAllLogsFromMongoDb" engine="java"
        location="org.ofbiz.webtools.MongoDbServices" invoke="getAllLogsFromMongoDb" auth="true" use-transaction="false">
    <description>Gets logs from MongoDB</description>
    <attribute name="logList" type="List" mode="OUT" optional="false"/>
</service>
The service will return the most recent log entries in a List object named “logList”.
7. Finally, implement the service defined in step 6. To accomplish this, add one Java file at framework/webtools/src/org/ofbiz/webtools folder with name “MongoDbServices.java”. Here is the complete code for this class:
package org.ofbiz.webtools;
import java.util.ArrayList;
import java.util.List;
import java.util.Map;

import org.ofbiz.base.util.Debug;
import org.ofbiz.service.DispatchContext;
import org.ofbiz.service.ServiceUtil;
import com.mongodb.DB;
import com.mongodb.DBCollection;
import com.mongodb.DBCursor;
import com.mongodb.DBObject;
import com.mongodb.MongoClient;
public class MongoDbServices {
    public static final String module = MongoDbServices.class.getName();

    public static DBCollection getConnectionMongoDb(String username, String password, String dbName, String collectionName) {
        DBCollection coll = null;
        try{
           // To connect to mongodb server
           MongoClient mongoClient = new MongoClient( "localhost" , 27017 );
           // Now connect to your databases
           DB db = mongoClient.getDB(dbName);
           Debug.log("Connect to database successfully");
           boolean auth = db.authenticate(username, password.toCharArray());
           Debug.log("Authentication: "+auth);

           coll = db.getCollection(collectionName);
        }catch(Exception e){
           System.err.println( e.getClass().getName() + ": " + e.getMessage() );
        }
        return coll;
     }

    public static Map<String, Object> getAllLogsFromMongoDb(DispatchContext dctx, Map<String, ? extends Object> context) {
        List<DBObject> logList = new ArrayList<DBObject>();
        DBCollection collection = getConnectionMongoDb("ofbiz", "ofbiz", "ofbiz", "applicationLog");
        DBCursor cursor = collection.find().limit(400);
        while (cursor.hasNext()) {
            DBObject dbObject = cursor.next();
            logList.add(dbObject);
        }
        Map<String, Object> resp = ServiceUtil.returnSuccess();
        resp.put("logList", logList);
        return resp;
    }
}
The above implementation is just a simple example that can be enhanced. A method named “getConnectionMongoDb” establishes a connection with the Mongo database. The DBCollection object provides various methods to fetch and insert the data: you can get more information about DBCollection API here. The “getAllLogsFromMongoDb” method fetches the last logs (up to 400) and returns them in the List named “logList”.
Conclusions
We can now build and start OFBiz by using the command “./ant build start”.
Login to the Webtools application and go to the “Logging” tab. Click on the new menu of “View MongoDB logs”. You should now be able to see the logs stored in MongoDB. The screen should look like this:

This concludes the 2nd installment in the MongoDB series. In the next installment, we will enhance our screen by adding filters to search through logs for different log levels.
To learn more about how HotWax Systems can help you use the power and flexibility of OFBiz to benefit your business, contact us for a free consultation.