
In our previous blog posts we have shared how to set up the JMeter environment and the importance of performing scenario based testing using Apache JMeter. Now let’s explore some of the fundamental use cases for an ecommerce system. Use case analysis is the standard technique for analyzing the requirements of an application. The goal of this document is to share details of standard eCommerce use cases and jmeter tests implementation. The following use cases represent some of the most common and important elements of any eCommerce ERP solution: Performing a product search and getting a desired result, and placing an order as a registered or anonymous user.
Use Cases for an E-commerce application
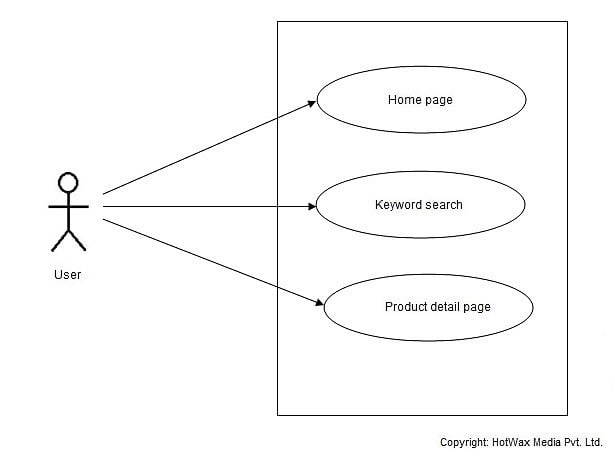
1. Product Search
| Use case name | Product search |
| Actor | Anonymous / Registered visitor |
| Description | In this use case we will discuss about performing a product search. The product search should be easy for a user to get through the system and land on the desired product. The User comes on the site and search few products. In this way user visits multiple pages of the site in its one visit and stay for 2-5 minutes with an average time spent on each page as 30-60 Secs. |
| Normal Path | 1) Home Page 2) Keyword Search 3) Product Detail Page |
| Alternative path | N/A |
Figure (a): Use case diagram for OFBiz Ecommerce product search

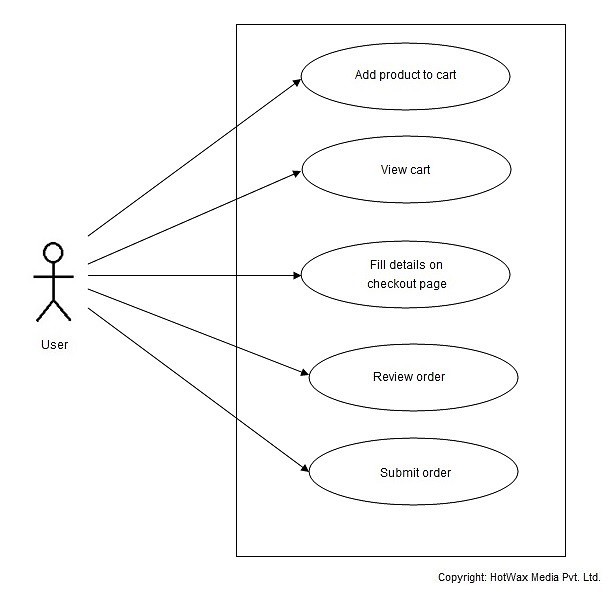
2. Order by Anonymous users
| Use case name | Order by Anonymous users |
| Actor | Anonymous Visitor |
| Description | In this use case the order is placed by an Anonymous User. The User follows the same steps for performing a product search mentioned in use case #1 and and place an order with multiple items as anonymous user. User follows all the steps of product search and then continues for checkout. |
| Normal Path | 1) Add products to cart 2) View Cart 3) Fill the details of checkout page. 4) Review Order 5) Submit Order |
| Alternative path | N/A |
Figure (b): Use case diagram for Order by Anonymous users
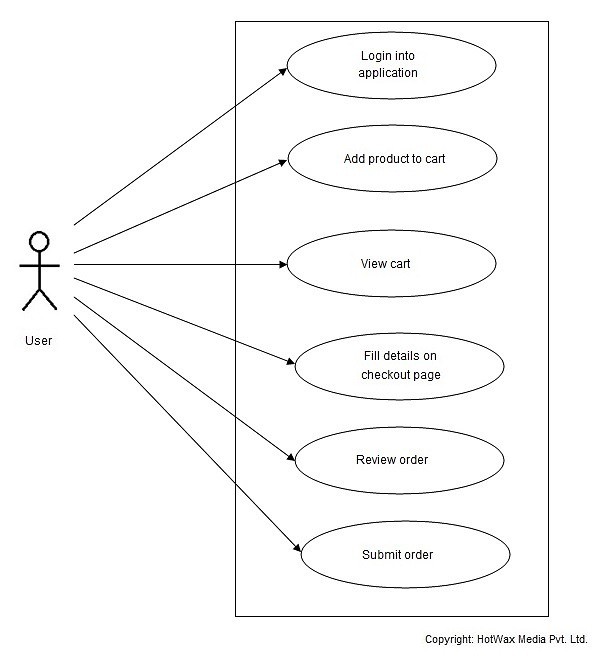
3. Order by Registered users
| Use case name | Order by Registered users |
| Actor | Registered Visitor |
| Description | In this use case the user follows the steps as per use case #1 and searches products on site. The order placed with multiple items is as Registered User. The User logs into the site and follows all the steps of product search and then continues for checkout. |
| Normal Path | 1) Login into application 2) Add products to cart 3) View Cart 4) Fill the details of checkout page 5) Review Order 6) Submit Order |
| Alternative path | N/A |
Figure (c): Use case diagram for Order by Registered users
Definition for the JMeter Test Plan for E-Commerce application:
First of all, give your test plan a name and add user variables which are globally used by the script. These user variables include information about target site url and database specifications. They are shown in the picture below:
Here HOST variable value should be the URL that is being load tested. HTTP_PORT and HTTPS_PORT define non-secured and secured ports of the application to be tested. DB_HOST_PORT defines the database URL and port. DB_USERNAME should have value of the username of database used for your application and DB_NAME is the name of database for your application.
1. Product Search:
Following are the steps for defining a JMeter Test Plan for Product Search thread:
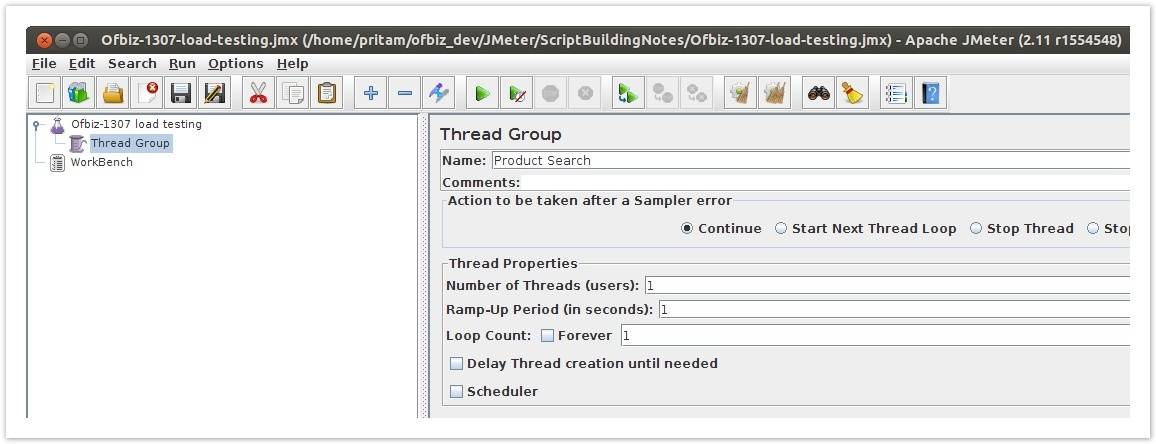
Step 1: Add one thread group inside test. Name that thread group as “Product Search”.
Step 2: Then add User Defined Variables and HTTP request defaults Config elements. User Defined Variables to be added are as follows:
| Name of Variable | Value of Variable |
|---|---|
| VARIABLE_VALUE_OF_PRODUCT | ${__P(VARIABLE_VALUE_OF_PRODUCT)} |
| VARIABLE_VALUE_OF_PRODUCT_NAME | ${__P(VARIABLE_VALUE_OF_PRODUCT_NAME)} |
| COUNT | ${__P(COUNT, 0)} |
| PRODUCTS_STRING | ${__P(PRODUCT_STRING,Micro Chrome Widget&Tiny Chrome Widget)} |
| CATEGORY_STRING | ${__P(CATEGORY_STRING,Gizmos&Widgets)} |
Step 3: Add one loop controller (with loop count of 2) for iterating each thread for searching products two times. Inside the loop controller, add one HTTP request sampler to hit the main page of eCommerce site (Url: /ecommerce/control/main).
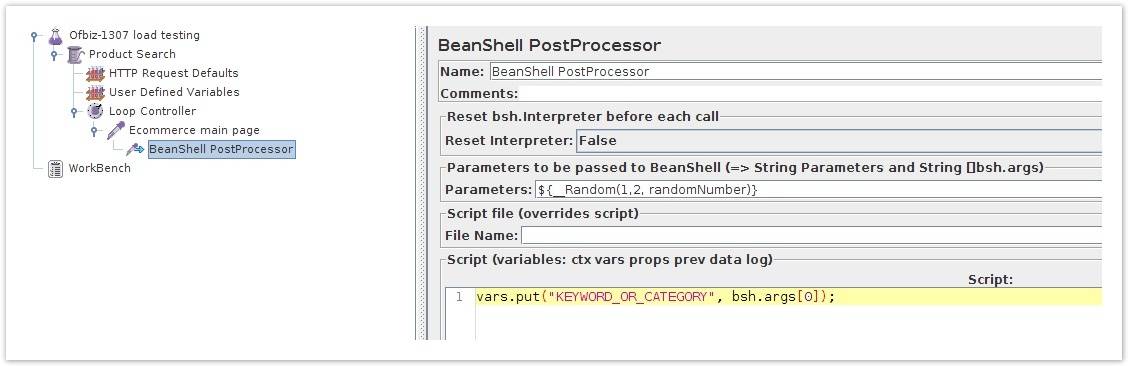
Step 4: Add one BeanShell PostProcessor to randomize the product search and category search in the thread. Do it as shown in following picture:
Step 5: Add if controller inside loop based on the value of “KEYWORD_OR_CATEGORY” variable generated in last step.
If this variable is “1” then go for keyword search and if “2” then go for category search.
Step 6: Add one HTTP request sampler with path /ecommerce/control/keywordsearch and POST data request to go for keyword search. Parameters to be posted are as follows:
| Parameter Name | Value of Parameter | Details about parameter |
|---|---|---|
| SEARCH_STRING | ${VARIABLE_VALUE_OF_PRODUCT} | This value will dynamically fetched using BeanShell script and user defined variables |
| VIEW_SIZE | 10 | Number of results per page |
| PAGING | Y | Flag for pagination |
| SEARCH_CATEGORY_ID | CATALOG1_SEARCH | |
| SEARCH_OPERATOR | OR |
Step 7: Add the following BeanShell script inside keyword search request to manipulate the loop count and string to be searched dynamically.
String productListInString = vars.get( "PRODUCTS_STRING" ).toString();String[] productListArray = productListInString.split( "&" );int productListLength = productListArray.length;Random random = new Random();int count = random.nextInt(productListLength);if (count > productListLength) { count = 0 ; }vars.put( "VARIABLE_VALUE_OF_PRODUCT" , productListArray[count]);print( "Product" + productListArray[count]);vars.put( "COUNT" ,count.toString());vars.put( "LOOP_COUNT" , Integer.toString(productListLength)); |
Step 8: Add one Regular expression extractor to extract the value of the product page url from the rendered page after search result to hit the product page. It should be stored into the “VARIABLE_VALUE_OF_PRODUCT” variable.
Step 9: Add HTTP request sampler with the path value /ecommerce/${VARIABLE_VALUE_OF_PRODUCT_NAME}. It will redirect request to the product detail page.
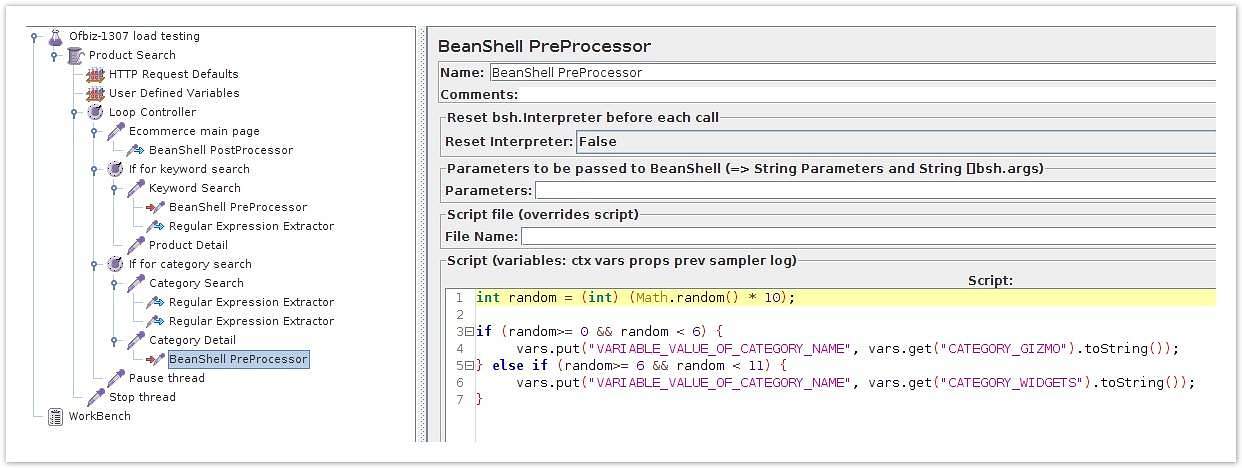
Step 10: The case is the same for the category search. Only difference in category search is we pickup category url from main page itself and randomize the category page visits by using BeanShell script.
Step 11: After that we add some pause timer and then we stop the thread. Total structure and BeanShell of randomizing the category page url will look like the following picture:
2. Order by Anonymous users:
Step 1: Add HTTP Request Defaults and CSV Data Set Config configuration elements inside new thread group for Anonymous user orders.
Step 2: In CSV Data Set Config, give filename of the CSV file which contains all valid product Ids and variable name as ‘productId’.
Step 3: Add HTTP request sampler and provide path as /ecommerce/control/additem to add item into the cart. The minimum data should be posted with this request is as follows:
| Parameter Name | Value of parameter | Details about parameter |
|---|---|---|
| add_product_id | ${productId} | Automatically accessed sequentially from CSV file |
| quantity | 1 | Specify quantity of the product to be added |
| product_id | ${productId} | Automatically accessed sequentially from CSV file |
Step 4: Add HTTP request sampler with path as /ecommerce/control/view/showcart to view the cart.
Step 5: Add HTTP request sampler with path as /ecommerce/control/setCustomer to go to set the customer information.
Step 6: Add HTTP request sampler with path as /ecommerce/control/processCustomerSettings with following minimum required data to be posted:
| Parameter Name | Value of parameter |
|---|---|
| firstName | DemoAnonymous |
| lastName | Customer |
| homeCountryCode | 123 |
| homeAreaCode | 123 |
| homeContactNumber | 123 |
| homeExt | 1234 |
| emailAddress | DemoAnonymousCustomer@gmail.com |
Step 7: Add regular expression extractor into this sampler to extract the partyId which is rendered on the page. Add some pause time after that.
Step 8: Add HTTP request sampler with path as /ecommerce/control/processShipSettings to set shipping details with the following required parameters:
| Parameter Name | Value of parameter |
|---|---|
| address1 | 53-A |
| partyId | ${partyId} (This is dynamically taken from last regular extractor) |
| city | SLC |
| postalCode | 844011 |
| countryGeoId | USA |
| stateProvinceGeoId | UT |
Step 9: Add regular expression extractor into this sampler to extract the finalizeMode which is rendered on the page. Add some pause time after that.
Step 10: Add HTTP request sampler with path as /ecommerce/control/processShipOptions with the minimum data posted as follows:
| Parameter Name | Value of parameter |
|---|---|
| finalizeMode | ${finalizeMode} |
| shipping_method | NEXT_DAY@UPS |
| may_split | true |
| is_gift | false |
Step 11: Add HTTP request sampler with path as /ecommerce/control/setPaymentInformation to add payment related information. The minimum data to be posted with this is as follows:
| Parameter Name | Value of parameter |
|---|---|
| paymentMethodTypeId | CREDIT_CARD |
Step 12: Add HTTP request sampler with path as /ecommerce/control/enterCreditCardAndBillingAddress to add billing information. Add some pause after this thread. The minimum data to be posted with this is as follows:
| Parameter Name | Value of parameter |
|---|---|
| contactMechTypeId | POSTAL_ADDRESS |
| paymentMethodTypeId | CREDIT_CARD |
| createNew | Y |
| address1 | 53-A |
| partyId | ${partyId} |
| city | SLC |
| postalCode | 844011 |
| countryGeoId | USA |
| stateProvinceGeoId | UT |
| firstNameOnCard | DemoAnonymous |
| lastNameOnCard | Customer |
| cardType | visa |
| cardNumber | 4111111111111111 |
| expMonth | 01 |
| expYear | 2023 |
Step 13: Add HTTP request sampler with path as /ecommerce/control/processorder to submit the order. After this, the script structure will look as like in following picture: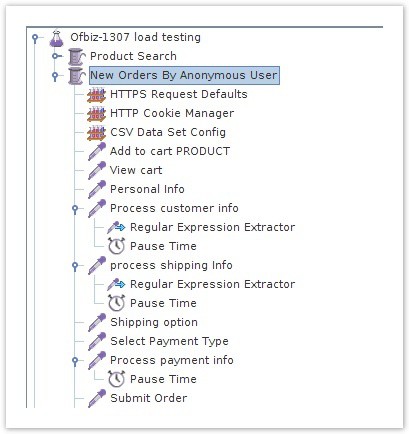
3. Orders by Registered users:
Step 1: Add User Defined Variable, HTTP request defaults, Two CSV Data Config elements and HTTP Cookie Manager Config elements inside the Orders by Registered users thread group. In this, we require two CSV file, one for product ids which is used for adding products to the cart and another is for userlogin details.
Step 2: Add HTTP request sampler to go to the main page. (path : /ecommerce)
Step 3: Add HTTP request sampler with path /ecommerce/control/checkLogin/main to login to the application. Minimum data to be posted with this request is as follows:
| Parameter Name | Value of parameter |
|---|---|
| USERNAME | ${userloginId} |
| PASSWORD | ofbiz |
Step 4: Add two regular expression extractors over here to logoutName and logout_url variable form the screen. The LogoutName variable is for adding the condition that if the rendered screen has a logout button then and then only do the next operations. The logout_url will help us at the time of logout after all the operations are done.
Step 5: Add if controller with condition “${logoutName}”==”Logout” which will allow further operations if and only if it finds logout button rendered after user logged in.
Step 6: Add HTTP request sampler with path as /ecommerce/control/additem to add item into the cart. Add some pause time in this request. The minimum data should be posted with this request is as follows:
| Parameter Name | Value of parameter | Details about parameter |
|---|---|---|
| add_product_id | ${productId} | Automatically accessed sequentially from CSV file |
| quantity | 1 | Specify quantity of the product to be added |
| product_id | ${productId} | Automatically accessed sequentially from CSV file |
Step 7: Add HTTP request sampler with path as /ecommerce/control/view/showcart to view the cart.
Step 8: Add HTTP request sampler with path as /ecommerce/control/checkoutoptions to go to checkout options page. Add regular expression inside it to fetch a “shipping_contact_mech_id” which is rendered on a page.
Step 9: Add HTTP request sampler with path /ecommerce/control/checkoutoptions to select the shipping address details. Minimum data required to be posted with this request is as follows:
| Parameter Name | Value of parameter |
|---|---|
| checkoutpage | shippingaddress |
| shipping_contact_mech_id | ${shipping_contact_mech_id} |
Step 10: Add HTTP request sampler with path /ecommerce/control/checkoutoptions to select shipping mode. Minimum data required to be posted with this request is as follows:
| Parameter Name | Value of parameter |
|---|---|
| checkoutpage | shippingoptions |
| shipping_method | NEXT_DAY@UPS |
| may_split | false |
| is_gift | false |
Step 11: Add HTTP request sampler with path /ecommerce/control/checkoutoptions to select payment details. Minimum data required to be posted with this request is as follows:
| Parameter Name | Value of parameter |
|---|---|
| checkoutpage | payment |
| BACK_PAGE | checkoutoptions |
| checkOutPaymentId | EXT_COD |
| singleUseGiftCard | Y |
Step 12: Add HTTP request sampler with path /ecommerce/control/processorder?checkoutpage=payment to submit and confirm the order. Add some pause time after this.
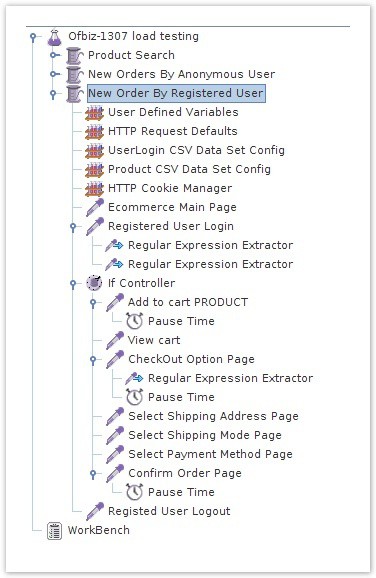
Step 13: At last add HTTP request sampler with the path value which was extracted in step 4 in variable logout_url. This will logout the current registered user thread being executed. After this, the structure of the script will look like picture below:
Implemented script sample for the e commerce use cases:
Here is a glimpse of the implemented scripts for above discussed use cases. Please have a look at the Implemented scripts for the use case. You simply need to explore this script, check it and execute. Below are the details:
- git clone https://github.com/ofbizecosystem/evolvingofbiz-loadtest.git
- Apply patches on OFbiz-13.07 branch code base from patches directory
- Load data from xml data files of data directory
- Open .jmx file for ecommerce use cases in Jmeter
- Modify script to set HOST and PORT related entries
This step by step guide will help you to define a test plan for performance testing of your ecommerce solution to check it for the key use cases mentioned in the blog. In our next blog posts we will share use cases about Order Manager and Warehouse Manager and how to create their test plans. So, please stay tuned for more updates in the ecommerce space.
Does your e-commerce solution have an adequate use case-driven test plan? Does the performance of your e-commerce solution meet or exceed industry standards? If the answer is “No” or you are unsure, Contact us today.
Thanks for your time!

