Technical Design for Apache OFBiz load testing with Apache JMeter

In our last blog post on Order Manager Use Cases in an E-commerce solution, we covered some of the basic roles and responsibilities of a Order Manager in an ecommerce system. This article continues the discussion, focusing on Apache OFBiz Warehouse Manager Use Cases and JMeter Tests implementation.
A Warehouse Manager is involved in many activities such as ensuring that orders are routed to the correct warehouse, as well as planning, coordinating, and monitoring the receipt, order assembly and dispatch of finished goods inventory. Here we showcase three main use cases; one is Quick Ship of Approved Orders, two is manual Pick and Pack of an order, and three is is Receiving inventory in the warehouse after inspection.
| Use Case Name | Quick Ship Approved Orders |
| Actor | Warehouse Manager |
| Description | Warehouse manager fulfills approved orders using “Quick Ship Entire Order” option. |
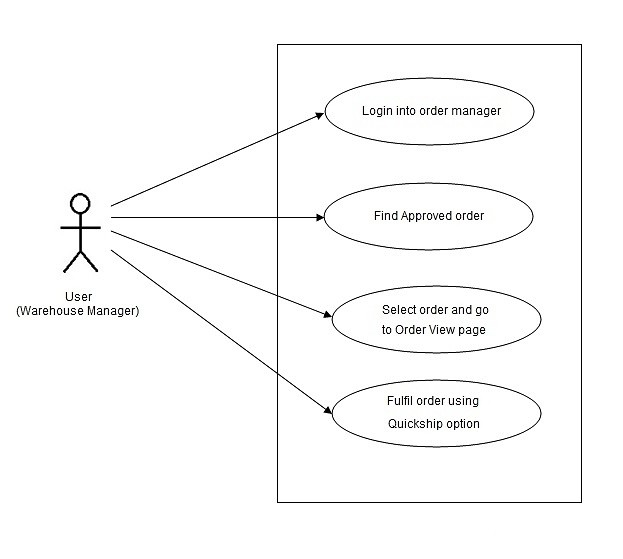
| Normal Path | 1) Login into order manager 2) Find Approved order 3) Select order and go to Order View page 4) Fulfil order using Quickship option. |
| Alternative Path | Please see below mentioned use case #2 for alternate method. |
Figure (a): Use case diagram for OFBiz Warehouse Manager (Quick Ship Approved Orders)
| Use case name | Order fulfilment using Picking-Packing process |
| Actor | Warehouse Manager, Picker and Packer |
| Description | Warehouse manager creates picklists for approved orders, picker picks the order items, packer packs and ships the order. |
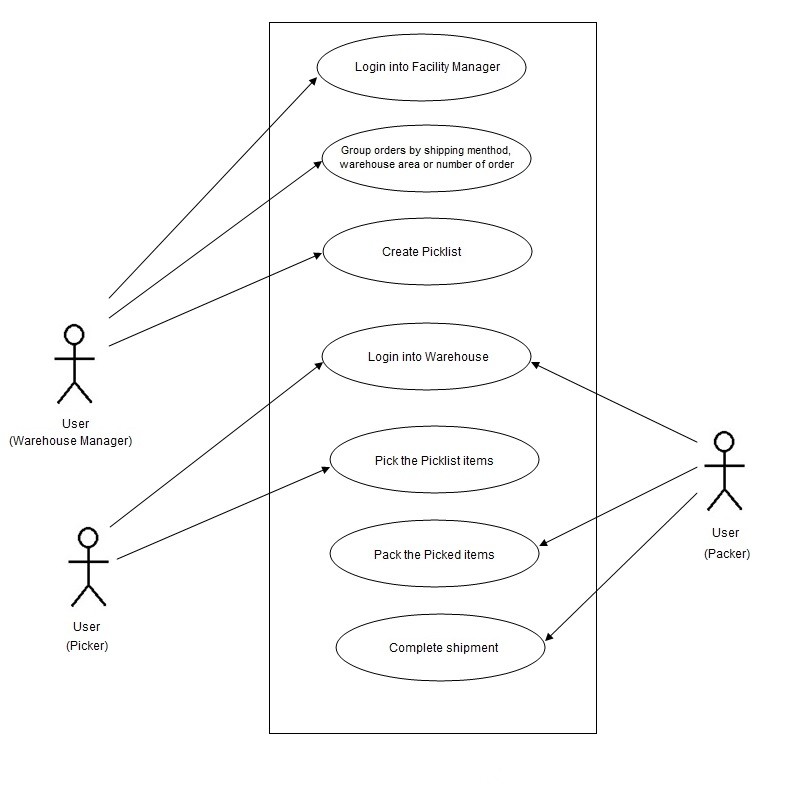
| Normal Path | 1) Login into Facility Manager 2) Group orders by shipping method, warehouse area or number of order items 3) Create Picklist 4) Pick the Picklist items 5) Pack the picked item 6) Complete shipment |
| Alternative path | For alternate method, please refer use case #1. |
Figure (b): Use case diagram for OFBiz Warehouse Manager (Order fulfilment using manual Pick Pack process)
| Use Case Name | Receive inventory |
| Actor | Warehouse Manager |
| Description | The Facility manager receives product inventory into the warehouse |
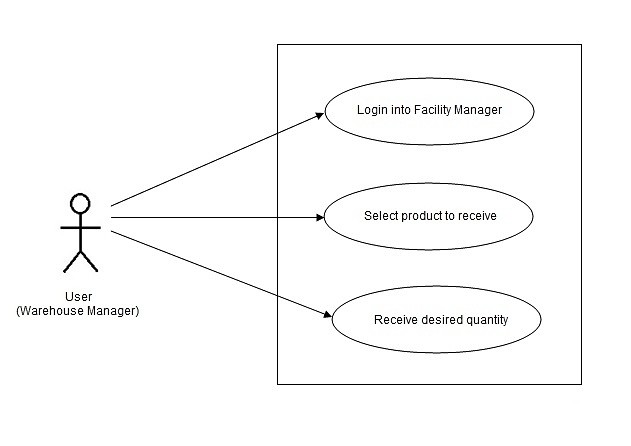
| Normal Path | 1) Login into Facility Manager 2) Select product to receive 3) Receive desired quantity |
| Alternative Path | N/A |
Figure (c): Use case diagram for OFBiz Warehouse Manager (Receive Inventory)
Now let’s discuss test implementation details for the following scenarios:
— Quick Ship Approved Orders
— Order Fulfilment – Picking
— Order Fulfilment – Packing and shipping
— Receive Inventory
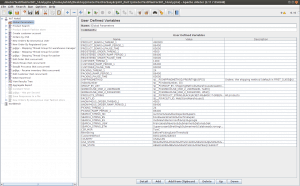
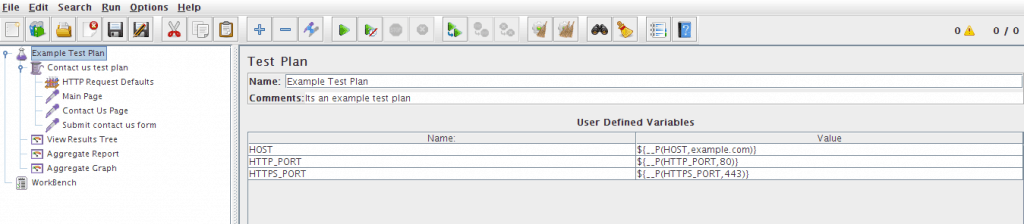
Step 1: Add User Defined Variables, HTTP Cookie Manager and HTTP Request Defaults configuration elements inside Quick Ship Approved Orders thread group.
Step 2: Add HTTP request sampler with path /ordermgr/control/login to login to the back-end application of warehouse manager. Minimum required data to be posted with this request is as below:
| Parameter Name | Value of Parameter |
|---|---|
| USERNAME | admin |
| PASSWORD | ofbiz |
Step 3: Add while controller with infinite looping using “true” condition as warehouse manager has to work continuously to ship all the approved orders.
Step 4: In while loop, add HTTP request sampler with the path /ordermgr/control/orderlist to display list of orders currently has been created and ready to ship. Minimum data that should be posted with this request is as follows:
| Parameter Name | Value of Parameter |
|---|---|
| changeStatusAndTypeState | Y |
| viewapproved | Y |
| view_SALES_ORDER | Y |
Step 5: Add regular expression extractor to extract the orderId value from the rendered page.
Step 6: Add if controller with the condition “${orderId}”!=”NA” for restricting further operations if no any orderId has been found in previous step.
Step 7: Inside if controller, add HTTP request sampler with path /ordermgr/control/orderview to go to order view page of particular order whose orderId is there in orderId variable. Minimum data to be posted with this request is as below:
| Parameter Name | Value of Parameter |
|---|---|
| orderId | ${orderId} (Dynamically from the extracted data) |
Step 8: Add HTTP request sampler with path /ordermgr/control/quickShipOrder to quick ship the order whose orderId is there in the orderId variable. Minimum data to be posted with this request is as below:
| Parameter Name | Value of Parameter |
|---|---|
| orderId | ${orderId} (Dynamically from the extracted data) |
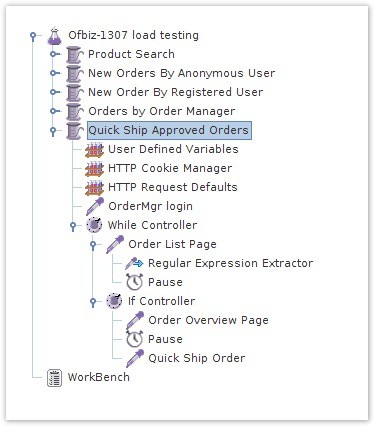
The structure of the load testing script after adding quick ship script will look like as shown below:
2) Order Fulfilment – Picking
Following are the steps used when designing load testing script for Picking process:
Step 1: Add User Defined Variables, HTTP Cookie Manager and HTTP Request Defaults configuration elements inside Picking thread group.
Step 2: Add HTTP request sampler with path /facility/control/login for logging in to the facility application. Minimum data to be posted with the request is as below:
| Parameter Name | Value of Parameter |
|---|---|
| USERNAME | admin |
| PASSWORD | ofbiz |
Step 3: Add while controller with infinite looping using “true” condition as picking process is continuous process.
Step 4: Add HTTP request sampler with path /facility/control/PicklistOptions to go to picklist options page. Minimum required data to be posted with this request is shown below:
| Parameter Name | Value of Parameter |
|---|---|
| facilityId | WebStoreWarehouse |
| ${pickingMethod} (This will come dynamically from BeanShell Script explained in next step) | Y |
Step 5: Add one BeanShell PreProcessor to decide which picking method to use randomly from the three different methods. The BeanShell Script for that purpose is as follows:
int random = (int) (Math.random() * 15);
if (random>= 0 && random < 6) {
    vars.put("pickingMethod", "groupByShippingMethod");
} else if (random>= 6 && random < 11) {
    vars.put("pickingMethod", "groupByWarehouseArea");
} else {
    vars.put("pickingMethod", "groupByNoOfOrderItems");
}
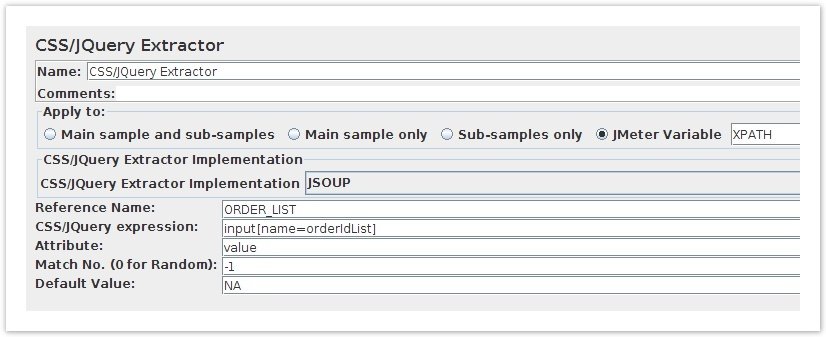
Step 6: Add CSS/JQuery extractor to extract the value of the orderId list which we need to pass in parameters for creating the picklist of same. It can be added as shown in picture below:
Step 7: Add HTTP request sampler with path /facility/control/createPicklistFromOrders to create picklist. Minimum required parameters to be passed with this request are as below:
| Parameter Name | Value of Parameter |
|---|---|
| facilityId | WebStoreWarehouse |
| ${pickingMethod} | Y |
| maxNumberOfOrders | 10 |
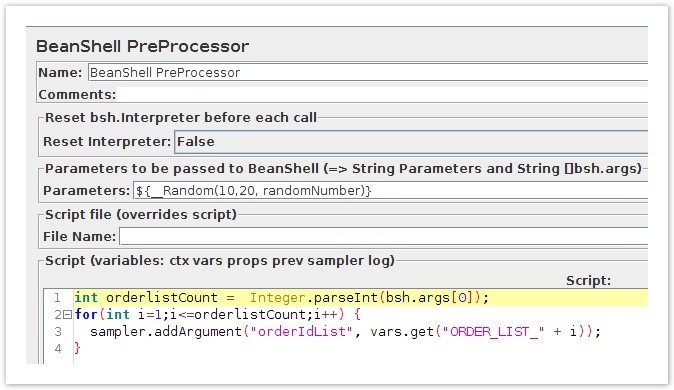
Step 8: Add one BeanShell PreProcessor script inside the above request for adding orderId list as a parameter to the request in step#7. The BeanShell Script should be added as shown in picture below:
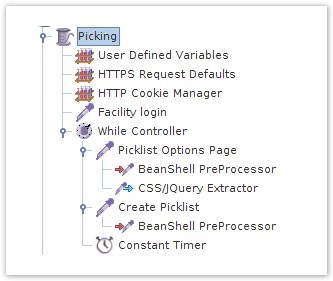
After adding this script, the structure of the script will look like this:
3) Order Fulfillment – Packing and Shipping:
Following are the steps used when designing load testing script for Packing and shipping the order:
Step 1: Add User Defined Variables, HTTP Cookie Manager and HTTP Request Defaults configuration elements inside Packing & Shipping thread group.
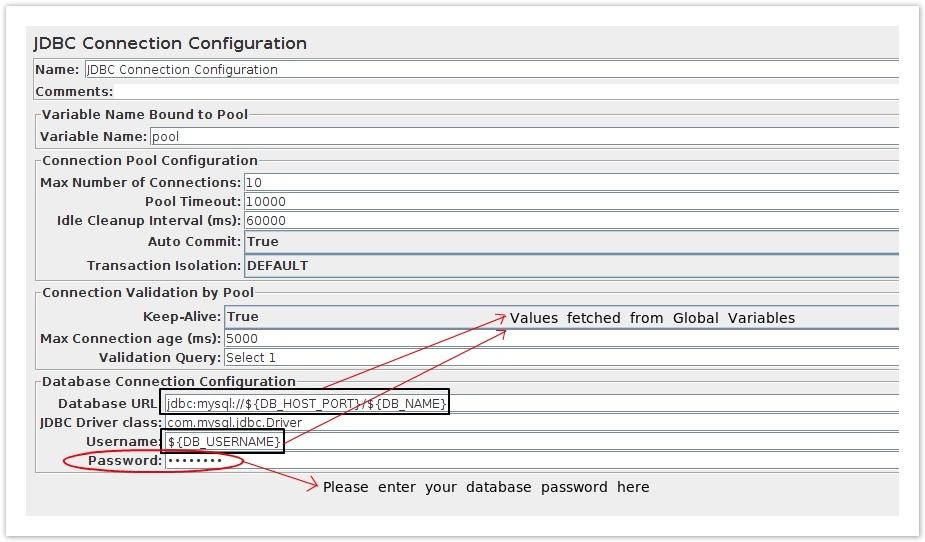
Step 2: Add JDBC Connection Configuration element also as this script requires JDBC connection. The settings to be done as shown in picture below:
Step 3: Add HTTP request sampler with path /facility/control/login to login to the facility application. Post Username and password as like in step#2 of Picking.
Step 4: Add while controller with infinite looping as like step#3 in Picking.
Step 5: Add HTTP request sampler with path /facility/control/PicklistManage?facilityId=WebStoreWarehouse to go to manage picklist page. Add regular expression extractor inside this to extract the value of picklistId which are rendered on the screen.
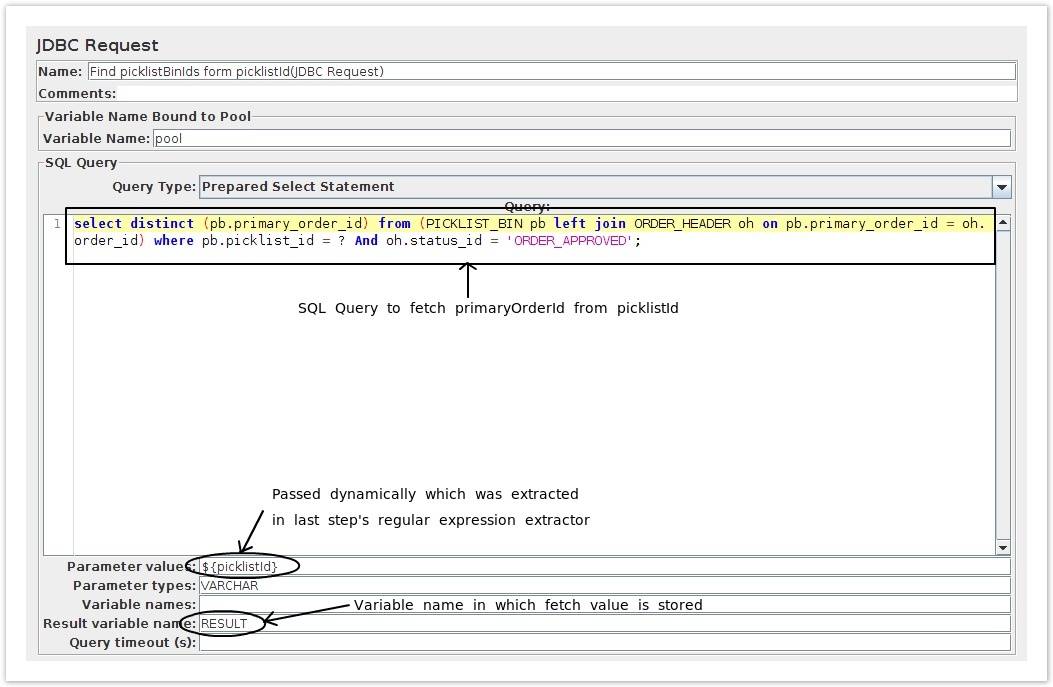
Step 6: Add JDBC request sampler after this to fetch primaryOrderId corresponding to the extracted picklistId. The settings to be done as shown in picture below:
Step 7: To find number of loop iterations to be done to pack all orders in the bin, we have to write one BeanShell PostProcessor script inside above step which will extract number of orders in particular bin.The script is as follows:
resultSize = vars.getObject("RESULT").size();
vars.put("NO_OF_ORDERS", Integer.toString(resultSize));
int whichPicklistBin = 0;
vars.put("whichPicklistBin", whichPicklistBin.toString());
Step 8: Add one loop controller with the loop count of number of orders in the bin which we have calculated in BeanShell script above.Step 9: Add HTTP request sampler with path /facility/control/PackOrder to go to pack order page with minimum parameters to be passed as below:
| Parameter Name | Value of Parameter |
|---|---|
| facilityId | WebStoreWarehouse |
| orderId | ${primaryOrderId} (This will come dynamically from BeanShell script explained in next step) |
Step 10: Write BeanShell PreProcessor script inside above step to extract primaryOrderId value inside known picklist bin. The script for that is as given below:
import java.util.Random;
int count = Integer.parseInt(vars.get("whichPicklistBin"));
columnValue = vars.getObject("RESULT").get(Integer.parseInt(vars.get("whichPicklistBin"))).get("PRIMARY_ORDER_ID");
vars.put("primaryOrderId", columnValue.toString());
count = count+1;
vars.put("whichPicklistBin", count.toString());
Step 11: Add some regular expression extractors to extract productId, quantity, ItemSeqId, packageSeq, orderId and shipGroupSeqId rendered on the screen in step#9. These variables are required in further steps.Step 12: Add HTTP request sampler with path /facility/control/ProcessBulkPackOrder to process the packing of order. The minimum parameters required to post with this request are as below:
| Parameter Name | Value of Parameter |
|---|---|
| orderId | ${orderId} |
| shipGroupSeqId | ${shipGroupSeqId} |
| facilityId | WebStoreWarehouse |
| originFacilityId | WebStoreWarehouse |
| hideGrid | N |
Step 13: We have to write one BeanShell script to add prefix and postfix values to the parameter to be submitted. These are required because one order can contain different products added into it. To differentiate them, parameter name should be unique. So prefix and postfix are added to it. Script for adding that is as below:
String postfix;
int count = Integer.parseInt(vars.get("productId_matchNr"));
for(int i=1;i<=count;i++) {
   postfix = i +"_g2";
   sampler.addArgument("prd_"+i, vars.get("productId_"+postfix));
   sampler.addArgument("pkg_"+i, "1");
   sampler.addArgument("numPackages_"+i, "1");
   sampler.addArgument("ite_"+i, vars.get("ItemSeqId_"+ postfix));
   sampler.addArgument("qty_"+i, vars.get("quantity_"+ postfix));
   sampler.addArgument("sel_"+i, "Y");
}
Step 14: Add some regular expression extractors to extract the values of shippingContactMechId, shipmentMethodTypeId, carrierPartyId, productStoreId and carrierRoleTypeId from the screen rendered in step#12.Step 15: Add HTTP request sampler with path /facility/control/CompletePack to complete the packaging of the order. Minimum required parameters to be passed with this request are as follows:
| Parameter Name | Value of Parameter |
|---|---|
| orderId | ${orderId} |
| shipGroupSeqId | ${shipGroupSeqId} |
| facilityId | WebStoreWarehouse |
| forceComplete | N |
| weightUomId | WT_lb |
| showInput | N |
| shippingContactMechId | ${shippingContactMechId} |
| shipmentMethodTypeId | ${shipmentMethodTypeId} |
| carrierPartyId | ${carrierPartyId} |
| carrierRoleTypeId | ${carrierRoleTypeId} |
| productStoreId | ${productStoreId} |
Step 16: Now picklist which is packed in the last steps, we should mark that picked. But to provide some check before marking any picklist as picked we add one if controller with condition “${NO_OF_ORDERS}” > “0” to check that number of orders which we found in step#7 are non zero. If non zero number of orders are found then go for marking picklist as picked.
Step 17: Add HTTP request sampler with path /facility/control/updatePicklist to update picklist status as picked. Minimum data to be posted with this request is as below:
| Parameter Name | Value of Parameter |
|---|---|
| facilityId | WebStoreWarehouse |
| picklistId | ${picklistId} |
| statusId | PICKLIST_PICKED |
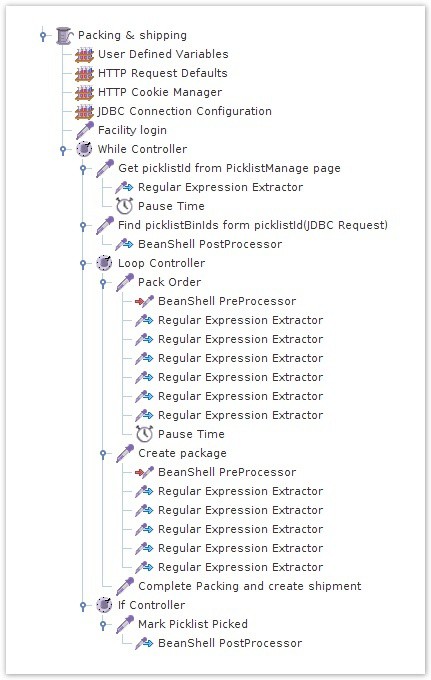
Add one BeanShell PostProcessor in this request to make NO_OF_ORDERS variable 0. After adding this script, structure of our script will look like picture below:
This section presents a step-by-step guide to create a load testing script for loading inventory.
Step 1: Add HTTP request defaults and HTTP Cookie Manager Configuration elements.
Step 2: Add HTTP request sampler with path /facility/control/main to go to main page for login into facility application. Post data ad stated in step#2 of Order fulfillment – Picking.
Step 3: Add one loop controller to control the number of times data to be loaded. For now we should make loop count as 1.
Step 4: Add CSV Data Set Config element inside the loop which contains two columns; one for productId whose inventory to be loaded and another is quantity of product to be added to inventory.
Step 5: Add HTTP request sampler with path /facility/control/ReceiveInventory?facilityId=WebStoreWarehouse to go to receive inventory page.
Step 6: Add HTTP request sampler with path /facility/control/ReceiveInventory to receive inventory form filling. We should post following minimum data with this request:
| Parameter Name | Value of Parameter |
|---|---|
| facilityId | WebStoreWarehouse |
| productId | ${productId} (This will be fetched automatically from CSV file) |
Step 7: Add BeanShell PreProcessor inside above request to randomly calculate locationSeqId for the inventory. The BeanShell script is as follows:
int random = (int) (Math.random() * 20);
if (random>= 0 && random < 6) {
    vars.put("locationSeqId", "TLTLTLLL01");
} else if (random>= 6 && random < 11) {
    vars.put("locationSeqId", "TLTLTLLL02");
} else if (random>= 11 && random < 16){
    vars.put("locationSeqId", "TLTLTLLL03");
} else {
    vars.put("locationSeqId", "TLTLTLLL04");
}
Step 8: Add HTTP request sampler with path /facility/control/receiveSingleInventoryProduct to receive and store the inventory. Minimum parameters to be posted with this request are as below:
| Parameter Name | Value of Parameter |
|---|---|
| facilityId | WebStoreWarehouse |
| productId | ${productId} |
| ownerPartyId | Company |
| inventoryItemTypeId | NON_SERIAL_INV_ITEM |
| quantityRejected | 0 |
| locationSeqId | ${locationSeqId} |
| quantityAccepted | ${quantity} |
There are other two parameters named unitCost and datetimeReceived whose values can be, for example, 10 and 2014-08-20 10:59:56.785 respectively. After adding this script, the structure of script will look like in picture below: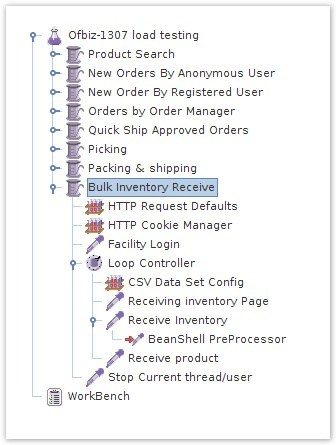
Please have a look at the Implemented scripts for the use case. You simply need to download this script, review it, and execute it.
Apache OFBiz helps retailers manage their warehouse and fulfillment needs flexibly, in ways that match their business processes. Whether using a complete warehouse management solution or just connecting to an existing warehouse management system (WMS), a good warehouse management strategy helps retailers streamline product management, inventory management, order management, and fulfillment, helping them improve delivery time, reduce costs, and create happy customers.
This information on JMeter can be used to to review and better understand Warehouse Management with an Apache OFBiz ecommerce ERP platform. Please contact us if you would like to know more about testing various parameters for OFBiz’s Warehouse Manager, or about anything else OFBiz!
Thanks for your time!